Gridview To Excel: This article explains how to export gridview to an Excel file in Asp.net C#. When I was working on my previous projects, there is a requirement by one of my clients that he wants to export data into MS Excel format.
The data could be from Asp.net GridView Control or any other data-bound control or directly from code-behind DataTable. I have to export Asp.net GridView / Repeater control / DataTable data to an Excel file using C#.
You can also check Import Excel sheet data to Gridview in Asp.net C#, How to export gridview to pdf in asp.net c#.
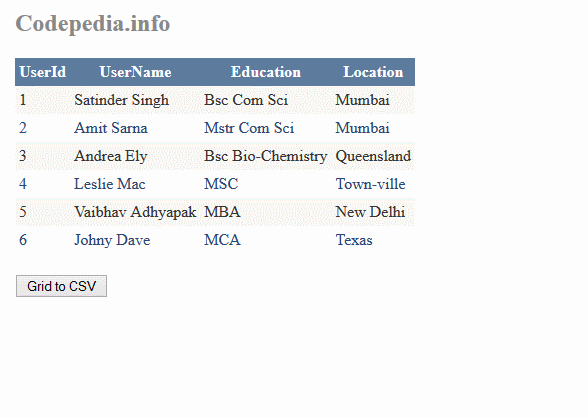
Demo:
Methods for Export Data to Excel in Asp.net C#
- By creating a CSV file - Have you ever opened a CSV file using EXCEL, if not then do open it once. What you are going to see in Excel, is your CSV values are displayed as table-structured data .i.e comma separated values are displayed as Table cell form data. For creating an Excel file in C#, you can use this approach, only if you don't want formatting, styles, or workbook structure.
- By creating XML files - Excel allows you to open XML files with or without a schema. You can also see a table of data in Excel and can have some control over formatting if you use a schema.
- By creating an SYLK file - Symbolic Link (SYLK) is a Microsoft file format typically used to exchange data between applications, specifically spreadsheets. SYLK files conventionally have a .slk suffix. Composed of only displayable ANSI characters, it can be easily created and processed by other applications, such as databases.
Using the above method, we can export gridview data to an Excel file.
Step to Export Gridview to Excel.
- Add Gridview and Button control.
- Bind Gridview with data.
- Code to export data to Excel.
# Html Markup: Add Asp.net Gridview control and button.
Create a new visual studio project, add a new Webpage (.aspx file), and now place an Asp.net `Gridview` control and a `button` control on the newly added Webpage. So our page markup looks like this as written below.
//*
<asp:GridView ID="GridView1" runat="server" OnSelectedIndexChanged="GridView1_SelectedIndexChanged" CellPadding="4" ForeColor="#333333" GridLines="None">
    <AlternatingRowStyle BackColor="White" ForeColor="#284775" />
    <EditRowStyle BackColor="#999999" />
    <FooterStyle BackColor="#5D7B9D" Font-Bold="True" ForeColor="White" />
    <HeaderStyle BackColor="#5D7B9D" Font-Bold="True" ForeColor="White" />
    <PagerStyle BackColor="#284775" ForeColor="White" HorizontalAlign="Center" />
    <RowStyle BackColor="#F7F6F3" ForeColor="#333333" />
    <SelectedRowStyle BackColor="#E2DED6" Font-Bold="True" ForeColor="#333333" />
    <SortedAscendingCellStyle BackColor="#E9E7E2" />
    <SortedAscendingHeaderStyle BackColor="#506C8C" />
    <SortedDescendingCellStyle BackColor="#FFFDF8" />
    <SortedDescendingHeaderStyle BackColor="#6F8DAE" />
</asp:GridView><br />
<asp:Button ID="Button1" runat="server" OnClick="Button1_Click1" Text="Grid to CSV" />
//*
# Code-behind: Bind Gridview control with data.
Here on code behind I have initialized a datatable and added some data to it.
And on the page load event I have to bind this datatable to my Asp.net Gridview control, you can also bind it with the database. So our code which shows data on gridview control looks like this as written below.
//*
protected void Page_Load(object sender, EventArgs e)
{
    if (!Page.IsPostBack)
    {
        GridView1.DataSource = getData();
        GridView1.DataBind();
    }
}

public DataTable getData()
{

    DataTable dt = new DataTable();
    dt.Columns.Add("UserId", typeof(Int32));
    dt.Columns.Add("UserName", typeof(string));
    dt.Columns.Add("Education", typeof(string));
    dt.Columns.Add("Location", typeof(string));
    dt.Rows.Add(1, "Satinder Singh", "Bsc Com Sci", "Mumbai");
    dt.Rows.Add(2, "Amit Sarna", "Mstr Com Sci", "Mumbai");
    dt.Rows.Add(3, "Andrea Ely", "Bsc Bio-Chemistry", "Queensland");
    dt.Rows.Add(4, "Leslie Mac", "MSC", "Town-ville");
    dt.Rows.Add(5, "Vaibhav Adhyapak", "MBA", "New Delhi");
    dt.Rows.Add(6, "Johny Dave", "MCA", "Texas");

    return dt;
}
//*
# Code to export data to Excel.
Yeah, now we are on the main part of this post i.e., code how to export gridview to Excel in c#. We can do this by using any one of the above methods. Let's first check by using Method 1, will update this with other methods later by this week
#Method 1: Create CSV file in Asp.net c#
For the most part, reading and writing CSV files are trivial. As the name suggests, a `CSV` file is simply a plain-text file that contains one or more values per line, separated by commas.
Each value is a field (or column in a spreadsheet), and each line is a record (or row in a spreadsheet)
CSV files can easily be read and written by many programs, including Microsoft Excel.
#Code: To generate a CSV file from the Gridview data.
Here we make a loop over Asp.net Gridview control and get the cell value and then append it to the StringBuilder variable. So our code looks like this as written below
//*
public void GridviewToExcel()
{

    StringBuilder builder = new StringBuilder();
    string strFileName = "GridviewExcel_" + DateTime.Now.ToShortDateString() + ".csv";
    builder.Append("Name ,Education,Location" + Environment.NewLine);
    foreach (GridViewRow row in GridView1.Rows)
    {
        string name = row.Cells[0].Text;
        string education = row.Cells[1].Text;
        string location = row.Cells[2].Text;
        builder.Append(name + "," + education + "," + location + Environment.NewLine);
    }
    Response.Clear();
    Response.ContentType = "text/csv";
    Response.AddHeader("Content-Disposition", "attachment;filename=" + strFileName);
    Response.Write(builder.ToString());
    Response.End();
}

protected void Button1_Click1(object sender, EventArgs e)
{
    GridviewToExcel();
}
//*
Note: Each comma represents a column.
Conclusion: Here in this article, we were successfully able to export gridview data into Excel file. You can get a working solution from GitHub here
Thank you for reading, pls keep visiting this blog and share this in your network. Also, I would love to hear your opinions down in the comments.
PS: If you found this content valuable and want to thank me? 👳 Buy Me a Coffee
Post Comment
Your email address will not be published. Required fields are marked *